How To Download Song From Itunes To Computer
Every bit a music fan, you might take nerveless a bunch of music in iTunes Library. Sometimes yous want to move music from iTunes to calculator for other purposes, or you have downloaded them but find them difficult to play on other software eventually.
In this guide, we are going to show you how to copy iTunes music to reckoner in iTunes. You could observe stride-by-step guide in the following. Besides, we'll innovate a powerful iTunes music downloader equally well, which supports to save iTunes music to computer and brand them playable on whatsoever other histrion for ameliorate enjoyment. Just get gear up and pick your best method!
CONTENTS
- Function 1. Download iTunes Music to Calculator Using iTunes
- Part 2. All-time iTunes Music Downloader: Consign Music from iTunes Straight
Part 1. Download iTunes Music to Calculator Using iTunes
To transfer music from iTunes to computer, you need to install the latest version of iTunes on your figurer first in society to get a smoothen process. Mostly speaking, downloading previously purchased music from iTunes to computer can exist easy if you lot follow the steps shown below. Let'southward move on!
Stride one. Launch iTunes and Sign in
Make sure that your iTunes is the latest version, if non, just upgrade information technology. Then run iTunes and sign in with your Apple tree ID.
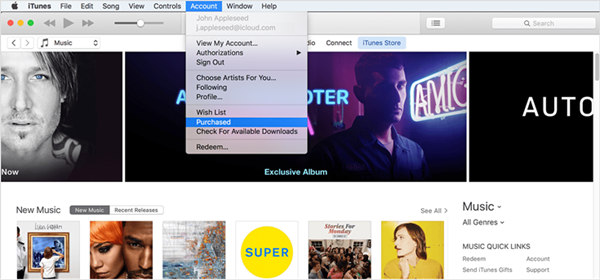
Step two. Discover Purchased Songs
Go to "Business relationship" > "Purchased" at the height of the menu bar of the master interface and the songs you accept purchased will come into view.
Footstep 3. Add Purchased Songs to iTunes
In the new interface, click the "Not in My Library" button, from which you are able to see the purchased songs non in your iTunes library. Select the albums or songs that y'all similar and so click the cloud-shaped icon in the upper right corner of each moving-picture show to download them to the library.
Now click the "Recently Added" playlist and you'll find the songs you downloaded simply at present. Check the albums and songs that you lot desire to download, if in that location is a download icon, just click information technology to download the music.
Step 4. Copy iTunes Music to Your Computer
By default, all your downloaded music tracks will be saved into the location of C:\users\[username]\ Music\iTunes . Or you can open up your iTunes and navigate to Edit > Preferences > Advanced to ostend your iTunes music content.
Now you've downloaded iTunes music to your computer successfully for offline playback. However, you can see all your downloaded iTunes music is in the formats of .m4a or other formats with built-in copyright protection (call DRM), which prevents you from playing on other devices such as Sony Walkman, SanDisk Clip Jam, and other MP3 players. To make your iTunes music more playable, it's highly recommended to utilize a versatile iTunes Music Downloader, which is able to convert iTunes songs to MP3 easily and move them to your calculator.
Part 2. Best iTunes Music Downloader: Download Music from iTunes Direct
TuneFab Apple tree Music Converter is a professional person iTunes music downloader. What makes it extremely popular is that it supports to download Apple Music and iTunes songs more straight from iTunes. In the meanwhile, it can even convert all the iTunes audio files to other formats including MP3, M4A, FLAC, AAC, etc. What's more, the greatest role virtually using TuneFab Apple tree Music Converter is that, it will permit you remove DRM from all protected iTunes audio files. Let'southward see how to use this iTunes music downloader to save iTunes music to computer.
Step 1. Download and Install
Click the button below to download the installation parcel on your computer, and then follow the education to install it.
Step 2. Select iTunes Music You Want to Download
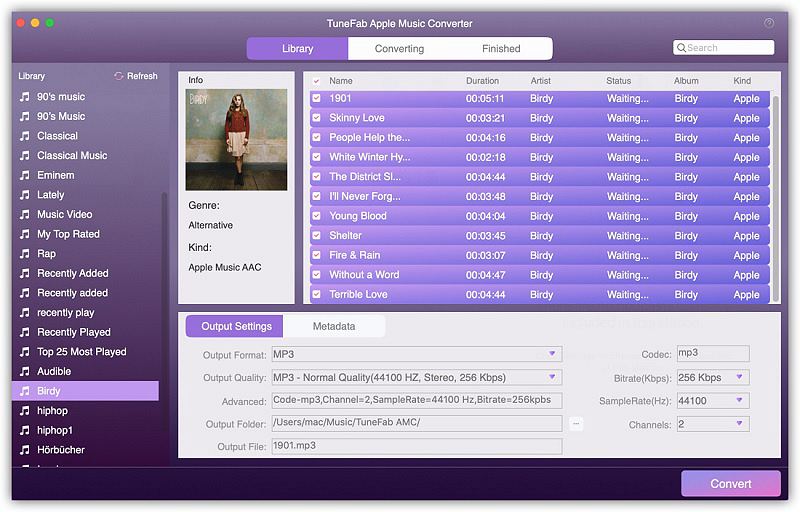
All the music in your iTunes library volition exist listed and you lot are able to bank check information technology in detail. If you lot tin can't discover the songs yous want, click the "Refresh" button at the top left corner. There are two ways for you to cull the songs:
#i. Tick the Checkboxes: If you lot are familiar with your playlists and know where the songs locate, and then it is the best fashion to add together Apple Music.
#2. Search from the Search Bar: If y'all tin't recall in which playlist the songs are, then yous can blazon the proper noun of the song/anthology/playlist/artist into the search bar at the tiptop correct corner.
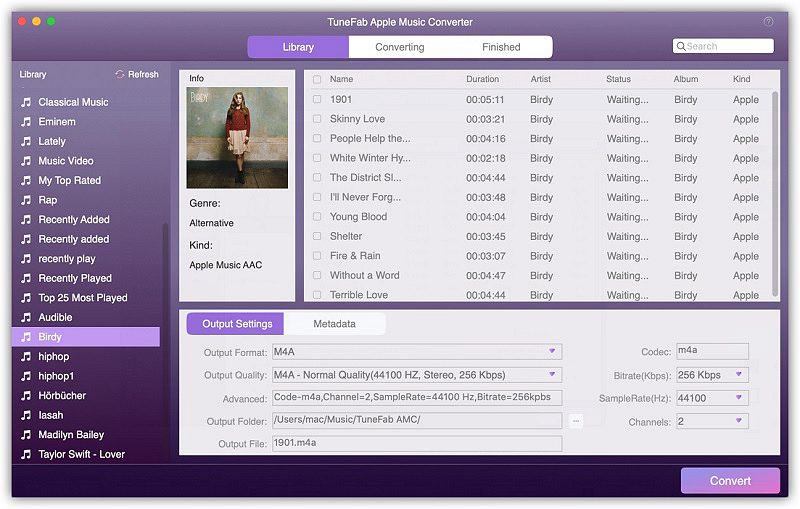
Step 3. Adjust Output Settings
It is quite convenient to customize your own output setting. Altogether in that location are two major settings that you need to pay attending to:
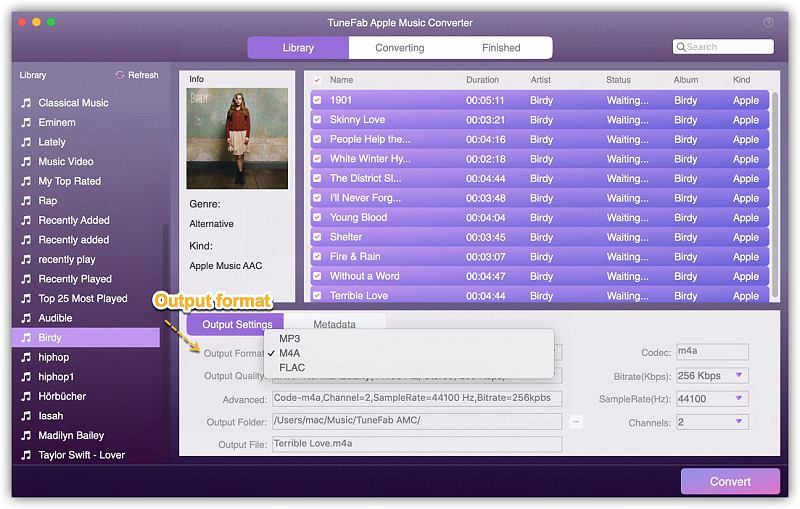
#1. Output Format
Click the drop-down button the cull a DRM-free format equally you like. Here we have MP3 as an example. If you click on it, then the iTunes music will exist downloaded to MP3.
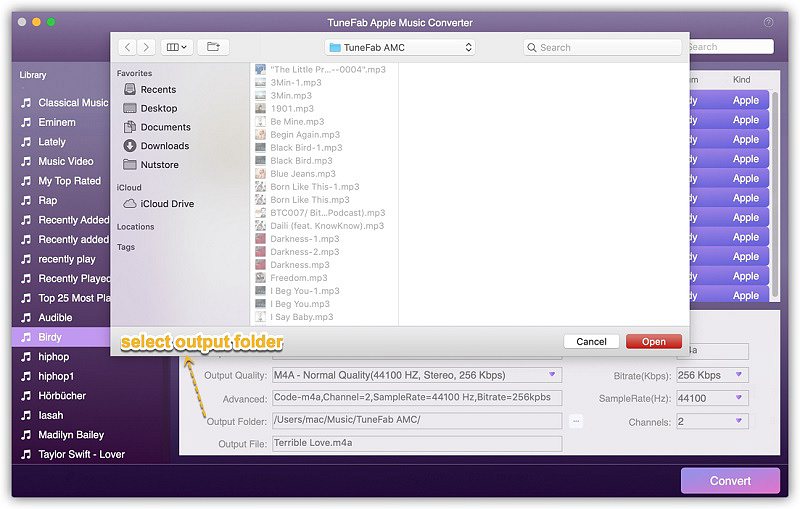
#ii. Output Binder
Click the "…" icon at the end of the "Output Folder" pick to select a folder to save the converted songs. Otherwise, the songs will be saved in the default folder.
Step four. Convert iTunes Music to MP3
After all the necessary settings, click on the "Catechumen" button and after a few minutes the songs volition be downloaded to MP3, which you lot are able to play whenever and wherever y'all want.
Conclusion
To sum up, to download iTunes music to computer in iTunes is a straight mode that no other tools are required. Even so, if yous desire to export music from iTunes, convert them into MP3 and make them playable on your personal portable devices, such every bit Sony Walkman, SanDisk Prune Jam, and other MP3 players, TuneFab Apple tree Music Converter would be your ane-cease solution. Whether the concise and easy-to-use interface it provides, or the DRM removal feature that allows you to catechumen all iTunes music into playable formats, this spread-out tool is definitely worth a try!
DOWNLOAD HERE
Posted by: michelleyounly.blogspot.com